# About S: Store Locator
## Highlight Features
#### 1. Unlimited store locations
Add unlimited locations (your own stores/your dealer's stores) to store locator map, this will help customers select from all the locations.
#### 2. Powerful & useful features
Bulk upload locations with a CSV file/spreadsheet, add location detail page, connect products, add meta tags, tracking code, heat-map view
#### 3. Bring customers to store
Easily search for stores by location/postcode/store name/product name and show physical locations of your stores on store locator map.
Add app: https://apps.shopify.com/storeify-store-locator
### **What is Store Locator & Map?**

Our Store Locator app will help you show all your physical stores on a single page on your Shopify website. Use Google maps to display store locations with exact addresses to make the shopping process as easy as it can be. With our app, you can add an unlimited number of store addresses that will be conveniently displayed and ordered as per your personal preferences.
## **App Features**
### **Storeify Store Locator App Key Features**
* Search store by location/postcode/store name/product name
* Bulk import store locations by uploading CSV file
* Change store locator page layout, map style, maker icon, etc
* Detail page and a contact form for each store/dealer
* Create a Dealer registration form & submission report
* Email service integrations
* Add your store a sticky icon to open store locator pop-up everywhere
* Search Analytics: Heatmap recent searches view, area charts, search data download
* Show the store list in a city by shortcode
* Multi-language (*It is not possible to automatically switch the language for the store name or store url in the location list*) - **Available from Pro plan**
### **Other Storeify Store Locator App Features**
#### FOR STORE ADMIN
* Create and manage multiple store locations
* Quick setup for a store locator/dealer locator page
* Show the Store locator map to any page via an app block / embedded code (including shopping cart page)
* Use Google maps to display store locations with exact store location addresses
* Unlimited locations: You can add an unlimited number of stores to the "Our Stores" page
* Add Marker clusters to Google Map
* Use many different maker icons ([How to do](https://sl-guide.storeify.app/faqs#6.-how-to-use-difference-maker-icons))
* For each store, you can add information like name, phone number, e-mail address, store address, postcode, ZIP code, etc
* Automatically calculate longitude and latitude from the store address
* The "Sort Order" field will help you arrange the stores in a specific order
* Upload store thumbnail
* Bulk import stores
* Export stores
* Delete all store locations with a click
* Contact form for each store
* Store detail page: show store description, contact information, hours of operation, and can show selected store products
* Set up SMTP to use your own email server
* Translate the language on the store locator page
* Compatible with multi-language apps (eg: Translation Lab, Langify...)
* Custom CSS, change color & map style.
#### FOR CUSTOMERS
* Easy to find a store by location/postcode/store name/product name
* Quickly Search the Nearest Store: your customers can use the function “Use My Location” feature that can automatically identify the customer's location then suggest stores are located within the radius that has been set
* Google Map Suggestion: Your customers just need to enter a few characters, then all relevant suggestions will come up in an auto-drop down list
* View full store list with custom pin icon on Google Maps
* Get instant directions from a location to any stores/dealers
* Mouse hover event on location highlights a maker on the map
* Easy to contact each store directly via address, phone, email address, or quick contact form.
Add app: https://apps.shopify.com/storeify-store-locator
# Pricing Plans
## All available plans
# Install app
Directly go to this link: [S: Store Locator](https://apps.shopify.com/storeify-store-locator) to install the app.
After adding the app to the store is complete, You need to go to the app dashboard and follow the recommended steps :
{% hint style="info" %} Make sure you have a **Google Map API Key** before proceeding with the next steps.
--> How to generate Google Map API Key: [https://sl-guide.storeify.app/google-map-api-key/generating-and-setting-api-keys](https://sl-guide.storeify.app/google-map-api-key/generating-and-setting-api-keys)
**Note**: *You need to enable the list of required APIs and enable billing on the Google Cloud Project.*
Don't worry about the cost when using Google Maps service,, currently Google Map has free caps for each plan, only when you exceed these caps, you have to pay (**about 10k maploads**): [https://mapsplatform.google.com/pricing/](https://mapsplatform.google.com/pricing/)
{% endhint %}
**If you want to preview the app on an unpublished theme, then follow the steps below:**
Go to **Theme setup** from the left sidebar -> Select the theme you want to apply -> Click the "Go to Theme Editor **> App Embeds**" -> Click the **Save** button in the upper right corner.
# Building a Store Locator page
## 1. Enable **App**
After installed our app, you need to enable the app before go to next step.
From the app admin, click the **Settings** on the left sidebar -> **General** -> **Enable App** -> Click the "Go to **Theme Settings > App Embeds**" button -> Enable the app by swiping the button to turn blue -> Click the **Save** button.
## 2. Disable App
From the app admin, click the **Settings** on the left menu -> **General** -> **Enable App** -> Click the "Go to **Theme Settings > App Embeds**" button -> Disable the app by swiping the button to turn gray -> Click the **Save** button
## **3. Add Location**
{% hint style="info" %} Before adding locations to the store list, You need to create your own Google API Key to ensure that the app works properly and smoothly (About 5 minutes to complete this).
--> How to generate Google Map API Key: [https://sl-guide.storeify.app/google-map-api-key/generating-and-setting-api-keys](https://sl-guide.storeify.app/google-map-api-key/generating-and-setting-api-keys)
**Note**: *You need to enable the list of required APIs and enable billing on the Google Cloud Project.*
Don't worry about the cost when using Google Maps service,, currently Google Map has free caps for each plan, only when you exceed these caps, you have to pay (**about 10k maploads**): [https://mapsplatform.google.com/pricing/](https://mapsplatform.google.com/pricing/)
Once you have the API Key, go to **Settings** -> **General** -> **Google map API key** -> Add API Key
{% endhint %}
### 3.1. Add a store location
Go to **Locations** on the left menu -> click the **Add location** button in the top right corner. Put your store information under "Add Location" box. Please see the screenshot below:
**Note**: to ensure the location is displayed on the map, you must tick the option "**Show location on store locator page**".
### 3.2. Add store location**s** by importing file
#### 3.2.1. Use an Excel file
Go to **Locations** on the left menu -> click the **Import** button in the top right corner.
1. Download the sample file by clicking the **Download Sample** button.
2. Use Excel or Google Sheet to edit the sample Excel file and add your stores.\
Some columns in excel file:\
\- **name**: Put the store location name (*required*). For example: *Store 01*\
\- **url\_key**: It is a url keyword to link to the detailed location page (*optional*). Contains no special characters, only alphanumeric and **-** . For example: *store-01*\
\- **status**: Put **1** to enable location, **0** to disable location (*required*).\
\- **thumbnail:** Put logo/image URL of location (*optional*).\
\- **email**: Email address (*optional*).\
\- **web\_text**: Website text (*optional*).\
\- **web**: Website URL (*optional*).\
\- **street**: (*required*). For example: *7207 Chagrin Road, Suite #1*\
\- **city**: (*required*). For example: *Chagrin Falls*\
\- **region**: (*optional*). For example: *OH*\
\- **postcode**: (*optional*) For example: *44023*\
\- **country**: (*required*). For example: *United States*\
\- **lat**: Latitude of location (*required* if importing by OPTION 2 - With Lat & Long)\
\- **lng**: Longitude of location (*required* if importing by OPTION 2 - With Lat & Long)\
\- **telephone**: Phone number (*optional*).\
\- **description**: This value will be displayed on the detailed location page (*optional*).\
\- **schedule**: This value will be displayed on the detailed location page (*optional*)\
\- **sort\_order**: Use natural numbers to sort order locations (0, 1, 2, 3,...). You can change the sort ascending or descending in the app settings. Default: 0 (*optional*).\
\- **products**: Help customers can search the location based on the product name. Also available products will be displayed on the detailed location page.(*optional*)\
\- **tags**: (*optional*). For example: *Open 24h,Free Wifi*

3. Import the Excel file with your store locators
With the Excel file import feature, you can use files with or without Lat & Long data.\
**OPTION 1 - Without Lat & Long:** *With this option, the import process might be a bit slow because the server has to use a lot of resources to complete it. However, you don't need to leave the screen on until it finishes; the process will run automatically in the background, and you can completely turn off the screen to do other things*.\
**OPTION 2 - With Lat & Long (*****Highly recommended*****):** If your Excel has the Latitude and Longitude for all locations, the import process will not require calling the Google Maps API, and the completion speed will be much faster than option 1.
Here's how to get longitude and latitude for numerous locations using AI: [https://sl-guide.storeify.app/building-a-store-locator-page#id-5.-how-to-get-latitude-and-longitude-using-google-gemini-ai)](https://sl-guide.storeify.app/building-a-store-locator-page#id-5.-how-to-get-latitude-and-longitude-using-google-gemini-ai)
**IMPORT STEPS:**
If you check "**Overwrite duplicate locations**", when importing the file, any locations in the current list in the admin app that are duplicates of locations in the file will be overwritten.
#### 3.2.2. Use a spreadsheet
To use this feature, go to **Locations** on the left menu -> click the **Import** button in the top right corner -> **Import the Google Sheet.**
**Note**: *To import from Google Sheet, the Google sheet structure must be the same as the sheet structure in the sample file. You should download the sample file to refer to the sheet structure.*
### 3.3. Import locations with products
From our excel sample file, you will see the **products** column. See screenshot below:
Use product IDs, product variant IDs, each ID is separated by comma.
If you only want to display the product, then just use the Product ID.
If you want to display variations of a product, use the following data structure: **PRODUCT\_ID\[Variant\_ID1, Variant\_ID2].**
Example**:** 6868392018085\[40212651901093,40212652097701]
* **Product ID**: 6868392018085
* **Variant IDs**: 40212651901093,40212652097701
*If you add all variant IDs of a product to the data, only that product will be displayed in the product list*.
### 3.4. Import locations with schedule (Operation Hours)
The data of the Schedule column is as follows:
**{"mon":{"status":"on","from":\["00","00"],"to":\["00","00"],"break\_from":\["00","00"],"break\_to":\["00","00"]},"tue":{"status":"on","from":\["00","00"],"to":\["00","00"],"break\_from":\["00","00"],"break\_to":\["00","00"]},"wed":{"status":"on","from":\["00","00"],"to":\["00","00"],"break\_from":\["00","00"],"break\_to":\["00","00"]},"thu":{"status":"on","from":\["00","00"],"to":\["00","00"],"break\_from":\["00","00"],"break\_to":\["00","00"]},"fri":{"status":"on","from":\["00","00"],"to":\["00","00"],"break\_from":\["00","00"],"break\_to":\["00","00"]},"sat":{"from":\["00","00"],"to":\["00","00"],"break\_from":\["00","00"],"break\_to":\["00","00"]},"sun":{"from":\["00","00"],"to":\["00","00"],"break\_from":\["00","00"],"break\_to":\["00","00"]}}**
* **mon, tue, wed, thu, fri, sat, sun:** Days of the week
* **status**: **on** is open, blank is closed
* **from - to**: working time of day
* **break\_from** - **break\_to**: break time during the day
* Time data is in 24-hour format. For example, if the opening time is **9AM** and closing time is **5PM**, the time data would be: **from":\["09","00"],"to":\["17","00"]**
### 3.5. Import locations with social networks
Please see the caption in the image below to fill in the correct information for the Social column.
### 3.6. Export store locations
1. Go to **Locations** on the left menu -> click the **Export** button in the top right corner.
2. Click the **Download CSV**/ **Download Excel xls**/ **Download Excel (xlsx)** button.
## **4. Edit Location**
Go to **Locations** on the left menu, on the "Locations" grid, you can see all locations you added. Click the edit icon to edit a location. The location editing interface is completely similar to the location adding interface.

### 4.1. Update latitude & longitude for location manually
For some reason, the longitude and latitude of the location are not correct, you can adjust these parameters manually.
Please go to **Edit** location -> **Preview**

## 5. How to Get Latitude & Longitude Using Google Gemini AI
1. Visit
2. Select **Gemini 2.0 Flash (Image Generation) Experimental**
3. Use this prompt:\
*"Help me get latitude and longitude for the addresses below and generate a table with 3 columns: Address, Latitude, Longitude."*\
Then, paste your list of addresses under the prompt.
4. Copy the results and paste each column into the matching column in our sample file.
5. Finally, use **Option 2: With Lat & Long** to import your Excel file.
✅ Tip: You can also do this using other AI tools like [ChatGPT](https://chatgpt.com/)
#### Important Considerations:
**Data Source**: The latitude and longitude were obtained using a geocoding service. Different services might provide slightly different results.
**Accuracy**: While generally accurate, geocoding can sometimes place a point at the center of a building or a general area. For very precise locations, especially within large buildings, more specific information might be needed.
**Unit Numbers**: Unit numbers (like #200, Suite A, Unit C-104) are generally included in the geocoding process, leading to a more specific location.
## **6. Delete Location**
Go to **Locations** on the left menu, on the "Locations" grid, you can see all locations you added. Click the delete icon to delete a location.
To delete all locations, follow the 2 steps in the image below:
## **7. Enable All Locations**
Go to **Locations** on the left menu, on the "Locations" grid, you can see all locations you added. To enable all inactive locations, follow these steps:
1. Select **Draft** menu on the top.
2. Tick the checkbox right below **All** to select all locations.
3. Click the **Set as active** button.
## **8. Disable All Locations**
Go to **Locations** on the left menu, click the **Locations** from the left sidebar. On the "Locations" grid, you can see all locations you added. To disable all active locations, follow these steps:
1. Select **Active** menu on the top.
2. Tick the checkbox right below **All** to select all locations.
3. Click the **Set as draft** button.
## **9. Frontend - Store Locator page**
Now let's see your results via link \*\*
For example:

You can also add the store locator map to any page:
## 10. Add the store locator map to a page on Vintage Theme
You can also embed the Store Locator map anywhere by adding the shortcode: **\[storeify-storelocator]**

## 11. Add store locator to the page on Store Online 2.0
The application supports adding Store Locator to the page in an intuitive way compatible with Online Store 2.0.
1️⃣ Go to **Shopify Admin** → Click on **Online Store** → **Themes**\
2️⃣ Find your current theme and click **Customize**\
3️⃣ In the theme editor, navigate to the page where you want to add the store locator\
4️⃣ Click **Add Section** -> **Apps ->** **S: Store Locator**\
5️⃣ Select it, and **Save** your changes
*Another way*: In app dashboard, go to **Setup Guide** section -> **Add Store Locator block (Optional)** -> Click **Add block**
# Showing location list in a city
With this feature, you can filter the list of store locations individually for each city. You can use this list to describe each city.
To use this feature, go to Settings -> General -> **Store list page** section -> Enable **Show locations by city on a Page**
You use the shortcode**:** **\[storeifyStorelocator city="City name"]** to show a list of store locations in the city.

# Create the details page
The details page displays all the information of each location of the store such as contact information, working hours, products available at the location, etc.

To display the details page, you need to enter the Url Key for each location.

In addition to the overview information displayed similar to the store list, the details page of each location can also display the description, working hours, and products available. In this Edit section you can add these informations.

Note: If you select all variations of a product, the product list will only display that product; if you select some variations (not all), the product list will display the selected product variations.
# Find store location in cart page
The store owner can add a store search widget to the shopping cart page so that customers can find the desired store through Zip code, store name, location, etc.
To set up this feature, you need to follow these steps:
* In app backend, go to **Settings** -> **General** -> Scroll down to the bottom -> **Add location to cart page** -> Tick it
* Go to **Online Store** -> **Themes** -> **Customize** -> Select **Cart** page -> **Add block** -> **Apps** -> Select " **Add location to cart**"
The position of the widget depends on your drag and drop
If the store search returns results, the customer can select a store to checkout, the address of this store will be added to the **Additional Details** box of the order.
# Theme setup
This menu helps you enable the app in any theme of the store you want.
Of course, to make the app work on the theme, you need to add the app block or add short-code to the landing page.
To enable the app for the theme, select the theme you want to apply -> Click the "**Go to Theme Editor > App Embeds**" -> Click the **Save** button in the upper right corner.
# Settings
he **Settings** section is where you enable app, set the necessary properties and customizations for the Store Locator page.
### General
Here you need to enter the Google Map API Key to activate the map.
{% hint style="info" %} To use the app smoothly and stably for a long time, you need to create a Google Map API Key (About 5 minutes to complete this).
--> How to generate Google Map API Key: [https://sl-guide.storeify.app/google-map-api-key/generating-and-setting-api-keys](https://sl-guide.storeify.app/google-map-api-key/generating-and-setting-api-keys)
**Note**: *You need to enable the list of required APIs and enable billing on the Google Cloud Project.*
Don't worry about the cost when using Google Maps service,, currently Google Map has free caps for each plan, only when you exceed these caps, you have to pay (**about 10k maploads**):
[https://mapsplatform.google.com/pricing/](https://mapsplatform.google.com/pricing/)
Once you have the API Key, go to **Settings** -> **General** -> **Google map API key** -> Add API Key
{% endhint %}
**Note**:
In addition, you can also set the *store listing display,* *number of fields visibility on the list and on the map*, *sort order type, search method, search radius, map zoom*, etc.
### Appearance
In this tab, you can choose layout style, map style, upload the maker icon, and customize the map interface with CSS code.
### Translate
Default language is English, you can translate to any language in **Default** tab.
Multi-language is supported. To use the language feature, click **Add language**, then translate this tab to the new language. However, ***the app cannot automatically translate the store name***.
Besides manually translating by filling in the corresponding text fields, you can also use the app's auto-translation feature. By clicking the "Auto translate" button and waiting a few seconds, the app will complete the translation for you.
### Email
In this tab, you set the email content to be sent to the store email when a customer submit the Contact Form on store detail page. You can also set up Google reCaptcha for contact form and dealer form here.
### SEO
Customize page title, page description for **SEO optimization** and embed the tracking code.
### Optimize
In some cases, you just want all of the Store locator source code to be called only on a specific page (including CSS and JS files), go to the **Optimize** tab and enter the URL Key of the page.
For example, the url of the store locator page is "*"* then the URL Key will be "**store-locator".**
# Analytics
This menu helps you to get statistics of recent searches, show search heat map and export search statistics to excel file.
# Dealer form
This is a form that helps store owners collect information about who wants to be their dealer.
## Enable Form
The application automatically generates a form with basic fields, you just need to enable it. Please go to **Dealer form** on the left sidebar -> **Active form** tab -> **Enable Form**
## Edit Form
Depending on your needs, you can completely customize the form easily.
### **Email Settings**
In this tab you need to set up an email address to receive notifications each time the form is submitted. In addition, you also need to set up the content of the email to be suitable for the purpose (the application has automatically generated sample content that may not be suitable for you).

### Email Integrations
The application is integrated with 8 most popular email services: **Mailchimp, Klaviyo, Campaign Monitor, GetResponse, Omnisend, Google Sheets, Active Campaign, HubSpot.**
With this feature, you can collect customer emails for email marketing strategies.

## Add form to page
### By add block
Go to **Dealer form** -> **Active form** -> **Enable form** and **Add form block** to any page you want.
### By add form short-code
At the Active Form tab, you get the short-code of the form: **\[storeifyapps-dealer-form]** , then you add it to the content of the page.

## How to add the submitted Dealer location to the Store Locator page?
First, let's see what fields are needed to create a valid location through the image below:
Next, you need to create a form with the necessary fields for a valid location so that subscribers can fill out and submit.
### How to add the correct fields to create a valid location?
In the step of adding a new field, be sure to select the correct field type for the location listed in the select-box at the bottom.
This selection helps you to create standard fields for the form, and once the form is submitted, the location information will be pushed to the **Location** tab of the **Submission details**.
The final step of adding the submitted location to the Store locator page is to go to **Submissions** on the left sidebar-> **Submission Details** tab -> **View details** -> Select **Location** tab -> Click the **Add to location list** button.
# SMTP
To set up the SMTP configuration, go to the **SMTP** menu on the left sidebar.
At this menu, you can configure your own email server service. In some cases, when you use the application's email server, emails sent to you or your customers may end up in the spam box. To prevent this, you should use your own email server and see the provider's parameters to fill in this section.
### 1. Use SMTP authenticate
We will guide you to set up SMTP with Gmail (if you use another email service, the setup is similar, just the parameters, you can get these parameters from the email service provider or search on Google).
**Important:** To create an app password, you need 2-Step Verification on your Google Account.
If you use 2-Step-Verification and get a "password incorrect" error when you sign in, you can try to use an app password.
1. Go to your [Google Account](https://myaccount.google.com/).
2. Select **Security**
3. Under "Signing in to Google," select **2-Step Verification**.
4. At the bottom of the page, select **App passwords**.
5. Enter a name that helps you remember where you’ll use the app password.
6. Select **Generate**.
7. To enter the app password, follow the instructions on your screen. The app password is the 16-character code that generates on your device.
8. Select **Done**.
**Final**: Go to our contact form app admin -> SMTP and put your Gmail information
**Note**: *You must receive a success message when you click the Test connection button for the configuration to be considered successful*.
### 2. Use OAuth 2.0 (Applies only to Google OAuth and Microsoft Office365 OAuth)
* If you use Gmail, you need to have the **Client ID** and **Client Secret** of the account. And here's a guide on how to create a Client ID and Client secret in Google Cloud Console:
* If you use Microsoft Office365 email, you need to have the **Client ID**, **Tenant ID** and **Client Secret**. And here's a guide on how to create the Client ID, Tenant ID and Client Secret in Microsoft Azure:
# How to Upgrade or Downgrade Your Plan
Follow these steps to change your subscription plan in the app:
### 1. Navigate to the Pricing Page
* From the left-hand menu, go to Apps.
* Select Store Locator.
* Click on Pricing (as highlighted in the screenshot).
### 2. Review Available Plans
* You will see multiple plans such as:
* Free
* Startup
* Pro
* Advanced
* Platinum
* Unlimited
* Each plan displays:
* Monthly price
* Features included
* Store location limits
* Free trial availability (if applicable)
### 3. Upgrade Your Plan
To upgrade to a higher plan:
1. Locate the plan you want to upgrade to.
2. Click the Select / Upgrade button (button text may vary depending on your current plan).
3. Confirm the subscription in the Shopify billing popup.
4. Your new plan will be activated immediately after confirmation.
### 4. Downgrade Your Plan
To switch to a lower plan:
1. Find the plan you want to downgrade to.
2. Click the Downgrade button under that plan.
3. Confirm the change when prompted.
Note:
* Downgrading may result in feature limitations (e.g., fewer store locations).
* If your current usage exceeds the new plan’s limits, you may need to reduce data (e.g., store locations) before downgrading.
### 5. Apply a Discount Code (Optional)
* At the top of the Pricing page:
1. Enter your discount code in the Discount code field.
2. Click Apply code.
* The discount will be applied to your selected plan if valid.
### 6. Important Notes
* Free Trial: Some plans include a 14-day free trial.
* Billing Cycle: Charges are handled by Shopify and follow your store’s billing cycle.
* Immediate Effect: Plan changes take effect right after confirmation.
# How to Uninstall S: Store Locator from Your Shopify Admin
If you no longer need the S: Store Locator app, you can uninstall it from your Shopify admin in just a few steps.
***
### Step 1: Go to the Apps Section
1. Log in to your Shopify admin
2. From the left-hand menu, click Settings > Apps
***
### Step 2: Locate the App
1. In the Installed apps list, find S: Store Locator
2. Click the three-dot (⋯) menu next to the app
***
### Step 3: Uninstall the App
1. From the dropdown menu, click Uninstall
2. Confirm the uninstallation when prompted
***
### Important Notes
* Once uninstalled, the app will be removed from your store immediately
* Any app-related configurations may be deleted
* Billing for the app will stop according to Shopify’s billing policy
***
### Need Help Before Uninstalling?
If you’re experiencing issues or considering uninstalling due to a problem, we recommend contacting support first. Our team can help resolve most issues quickly.
# FAQs
Summary of frequently asked questions
1.Why does the map show the message: "This page can't load Google Maps correctly"?
A common cause of this problem is related to billing. To solve the problem you need to enable billing on the Google Cloud Project at
Don't worry about the cost when using Google Maps service,, currently Google Map has free caps for each plan, only when you exceed these caps, you have to pay (**about 10k maploads**):
| **API** | **Free Tier/Month** | **Overage Cost (USD/1,000 requests)** | **Plan** |
| ------------------------------ | ------------------- | ------------------------------------- | ---------- |
| **Geocoding API** | 10,000 requests | $5.00 | Essentials |
| **Geolocation API** | 10,000 requests | $5.00 | Essentials |
| **Maps JavaScript API** | 10,000 requests | $7.00 | Essentials |
| **Places API - Autocomplete** | 10,000 requests | $2.83 | Essentials |
| **Places API - Place Details** | 10,000 requests | $5.00 | Essentials |
| **Places API - Nearby Search** | 5,000 requests | $32.00 | Pro |
| **Street View Static API** | 10,000 requests | $7.00 | Essentials |
2. Why does the map show the message: "Oops! Something went wrong."?
The main cause of your problem has to do with the **Store Locator page url** not being authorized with Google MAP Service. You need to add this url to the Google Maps API Referrer list according to the following instructions: 3. Why is the short-code added to the page but the map is not showing?
You may not have set up to allow the map to be displayed on the landing page.
Please go to **Settings** -> **Optimize** -> **Load app on** -> Select the type of page you want the map to display
If following the above method and the map still does not appear, then there is a possibility that there is a conflict between the theme and the app, please contact us to get the best support.
4. Why is the map not displayed on the homepage?
To show the store locator on the homepage, go to **Settings** -> **Optimize** -> Check the "**Homepage**".
This is simply the way the app optimizes the store's speed.
5. I have just changed my store theme and the Store Locator map doesn't work anymore
In this case, you just need to go to **Theme setup** from the left sidebar -> Select the theme you want to apply -> Just click the "**Go to Theme Settings > App Embeds**" -> Click the **Save** button in the upper right corner.
*(Another way*: In app dashboard, go to **Setup Guide** section -> **Enable the app embed block** -> Click the **Active app embed** button)
6. Why add new/delete/edit locations but store front is not updated?
To fix the issue, please follow these steps:
1. Go to Theme setup from the left sidebar -> Select the theme you want to apply -> Just click the "Go to Theme Settings > App Embeds" -> Click the Save button in the upper right corner.
2. One more small step to make sure the app works faster and without redundant code:
Go to Online Store -> Themes -> Select theme -> Actions -> Edit code -> Open the theme.liquid file -> Find and remove lines of code with "**storeify**".
**`{% include 'storeifyapps-storelocator-header' %}`**
**`{% include 'storeifyapps-storelocator-footer' %}`**
7. How to use difference maker icons?
If you just want to change the default Google maker icon for all locations on the map, then go to **Settings** -> **Appearance** -> **Map Styles** -> **Maker icon** -> **Upload image file** (image size is 40x40px recommended)
But if you want to use different icon maker for different locations then you need to upload the image to the intermediate server, then go to **Locations** -> **Edit location** -> **Location maker icon url** -> Enter the link to the uploaded image (Shopify server is recommended)
To add maker icons for multiple locations, you can also do it by importing the file.
8. The location's latitude and longitude are wrong, how do I correct them?
Please go to **Locations** -> **Edit location** -> Make sure you have checked "**Auto update the Lat & Long. Uncheck to update the Lat & Long manually.**" in the **Preview** box.
Then move your mouse over any field related to the Location's address and click it. The location's latitude and longitude data will automatically be updated correctly.
9.How to update multiple existing locations quickly?
The fastest steps to update existing locations:
1. Export the current location list to a CSV file.
2. Update the locations in the exported list.
3. Delete all locations in app admin.
4. Import the updated list.
10. How to active all location at once?
To enable all locations at once, please see the instructions in the image below:
11.How to activate all locations that are in draft status?
To activate all locations that are in draft status, follow these steps:\
Go to **Locations** -> Click on the **Draft** tab -> Check "**Select All**" -> Click on the "**Set as active**" button
12.How to sort store list?
You can sort the store list by 3 options: order number, store creation time and store name.
To select the sorting option, go to **Settings** -> **General** -> **Store list page** -> **Store list order by** -> **Select the sorting option**
For the Sort order option, you need to set up the order number for each store. See image below.
13.Why does the submission notification email only show the short-code instead of the content?
The reason for the problem is that the pre-filled short-code in the email content is just a sample short-code and it can vary from store to store. In the backend app, go to **Dealer Form** -> **Email Settings** -> **Email message** -> Reselect the required fields using **Choose custom filed** select box
14.Is it possible to create multiple store locator maps?
It is possible. We can customize based on the location filter tag.
For example: for the map #1, locations will be added the tag01. For the map #2, location will be added the tag02
We will create short-codes for each map.
**Note**: *Creating multiple maps is not a default feature of the app, so this customization is charged. Please contact us if you need it.*
15.Why is searching by location not giving any results?
Searching by location depends on two criteria: location and radius. Google Map determines the center coordinates of the area and then scans by radius. If no location is found, try increasing the radius.
16.Got this error: "API keys with referer restrictions cannot be used with this API" when importing file, how to fix?
To fix this issue, please follow the instructions below:
* Go to Google Cloud Console > APIs & Services > Credentials -> Located the key -> Edit -> API restrictions -> Select "**Don't restrict key**" -> Save
* Import file
* After successful import, please reselect "**Restict key**" in Google Map API Key settings
17.Why does the email notification content not display data fields but display short-codes?
The reason for the problem is that the pre-filled short-code in the email content is just a sample short-code and it can vary from store to store. In the backend app, go to **Dealer Form** -> **Email Settings** -> **Email content** -> Reselect the required fields using **Select box**
# Our Happiness Customers
Here are a few pictures of Store locator page from some of the thousands of customers who are using and happy with our app.


# Generating and Setting API Keys
## S**TEP 1: Create your first Google Cloud Console**
* Log in to the [Google Maps Platform Console](https://cloud.google.com/maps-platform/).
* Select [**Get Started**](https://console.cloud.google.com/google/maps-apis/start)**.**
* Create new project if you didn't have one.
## **STEP 2: Create the Billing Account**
* Go to the [Google Cloud Platform Console](https://console.cloud.google.com/getting-started?_ga=2.11775924.1445112601.1599583344-2118790495.1599583344).
* Click the menu button and select **Billing**.
* Set up your billing account.
* If this is your first billing account, select **Add billing account.**
* If you already have a billing account, select **Manage billing accounts.**
* Select **Create account,** then follow the instructions to set up your next billing account.
Don't worry about the cost when using Google Maps service,, currently Google Map has free caps for each plan, only when you exceed these caps, you have to pay (**about 10k maploads**):
| **API** | **Free Tier/Month** | **Overage Cost (USD/1,000 requests)** | **Plan** |
| ------------------------------ | ------------------- | ------------------------------------- | ---------- |
| **Geocoding API** | 10,000 requests | $5.00 | Essentials |
| **Geolocation API** | 10,000 requests | $5.00 | Essentials |
| **Maps JavaScript API** | 10,000 requests | $7.00 | Essentials |
| **Places API - Autocomplete** | 10,000 requests | $2.83 | Essentials |
| **Places API - Place Details** | 10,000 requests | $5.00 | Essentials |
| **Places API - Nearby Search** | 5,000 requests | $32.00 | Pro |
| **Street View Static API** | 10,000 requests | $7.00 | Essentials |
## STEP 3: Enable 5 Google Map APIs
Please follow the below steps :
* Go to **API & Services** > **Library** and choose **Maps** category
* Search for:
* **Geocoding API**,
* **Geolocation API**
* **Maps JavaScript API**
* **Places API (Old version)**
* **Street View Static API**
* Click to each and **Enable** it.****
* **Note: In case, all APIs are enabled but the issue still remains, please try to disable and re-enable all of them.**
## **STEP 4: Get API Access and enter it to the App**
* Select the menu button, then navigate to **APIs and services**.
* Select **Credentials**.
* Select **Create Credentials,** then select **API Key.**
* Add this API Key to the app, under **Your Google API Key**
* Select **Save.**
* Go to **Settings** -> **General** -> **Google map API key** -> Enter the API Key.
\****Important Note***: API keys are unique identifiers that allow you to connect to a specific service that an application program provides. Because these keys are unique to a specific user, it's important to always keep your API key safe and secure.
In case you want support from Google, you can go to the tab **Support**, read support articles, or create a case to have a conversation with Google.
Or you can go to this tab directly by the link: [**https://console.cloud.google.com/google/maps-apis/support**](https://console.cloud.google.com/google/maps-apis/support)
You can follow the instruction in the video below:
{% embed url="" %}
# API Key restrictions
So you have generated your key successfully. However, there are still a few other things you need to set up, like security to prevent anyone else misusing your key, as well as setting a budget so that you won't be charged more than you can afford.
Now the API key is generated. To avoid misuse, you need to set in [Google APIs](https://console.developers.google.com/apis/).
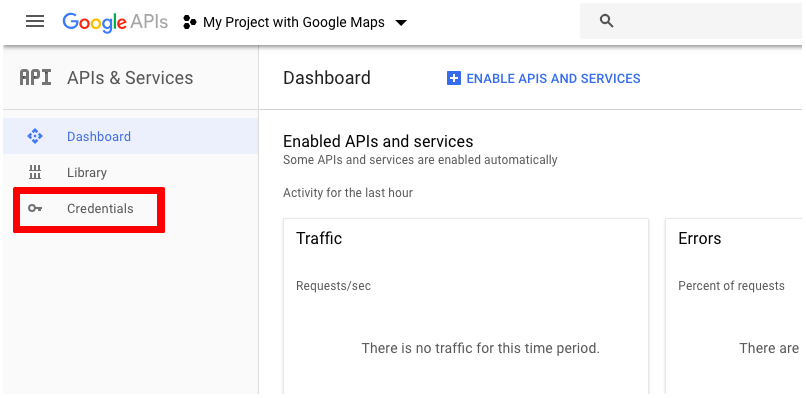
Once inside the site → Click **Credentials.**
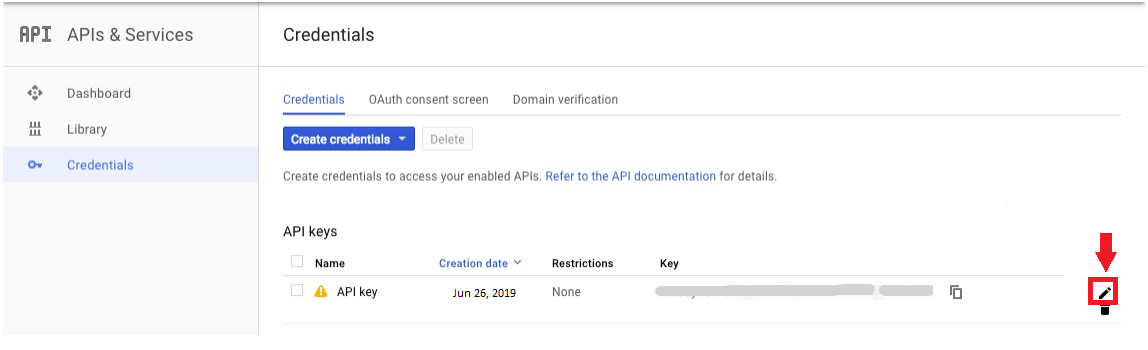
Here you can see the new API key. → Click the pencil icon  to edit it.
Now in the API key settings site, there are some adjustments that need to be done.
Firstly, you need to change the key name - as a general rule, it is named follow the site name or project name
In the **Key restrictions** you can see 2 tabs:
### **Application restrictions**
{% hint style="warning" %} **Note: If you use this tab, you need adding our app domain:** [**https://sl.storeify.app**](https://sl.storeify.app/*)**/\*, it is required.**
{% endhint %}
Select the option **HTTP referrers (web sites)** and enter the website name in the field. Use the format \*.[example.com/](http://example.com/). Any string can replace the asterisk, means that is even for subdomains. Also, you need adding our app domain: or \*.storeify.app/\* (the example image below)
### **API restrictions**
Choose the services that are enabled for this API key.
→ Click **Save**
# How to Limit Google Maps API Spending
You can absolutely limit your Google Maps API Key spending by setting up budgets and alerts in Google Cloud Console. The goal is to prevent excessive charges if your API gets too many requests.
## **1. Sign in to Google Cloud Console**
* Go to:
* Select the **Project** where your API Key is being used.
***
## **2. Set Up Budget & Alerts**
1. Go to **Billing** → **Budgets & alerts**
2. Click **CREATE BUDGET**
3. Select:
* **Billing account**: Your billing account
* **Scope**: Choose **Project** or **Service** (you can target only Google Maps APIs)
4. Set **Budget amount** (e.g., $20/month)
5. Add **Alert thresholds**:
* 50% → Email alert when spending reaches $10
* 100% → Email alert when spending reaches $20
* 120% → Email alert when over budget
6. **Save** the budget
> ⚠ **Note:** Budgets only **send alerts**; they do not automatically stop the API when the threshold is reached.
***
## **3. Limit API Request Quotas (to stop overspending)**
To actually **stop charges from exceeding your budget**:
* Go to **Google Cloud Console** → **APIs & Services** → **Enabled APIs & services**
* Select the API you want to limit (e.g., Geocoding API, Places API)
* Go to **Quotas** → adjust **Requests per day** or **Requests per minute**.
Example:
* Geocoding API → Requests per day = 1,000\
→ When the limit is reached, the API will stop responding for that day.
***
## **4. Remove or Restrict the API Key when not in use**
* Go to **APIs & Services → Credentials**
* Select your API Key → **Restrict key** to:
* Limit it to certain domains or IP addresses
* Allow only specific APIs
***
## 💡 **Best Practice Combination**:
* **Budget + Alerts** → Know when you’re close to your budget
* **Quota limits** → Ensure requests can’t exceed a safe amount
* **Restrict key** → Prevent unauthorized use of your API Key
# How to get Client ID and Client Secret in Google Cloud Console
To get a **Client ID** and **Client Secret**, you must create **OAuth 2.0 credentials** within a project in the Google Cloud Console. The process involves setting up an OAuth consent screen and then generating the credentials for a specific application type.
**Step-by-Step Guide**
1. **Go to the Google Cloud Console**
* Navigate to the Google Cloud Console and sign in with your Google account.
* Select an existing project from the top menu, or create a new one if needed.
2. **Enable the Necessary API**
* In the left-hand navigation menu, go to **APIs & Services** > **Library**.
* Search for the API you need (e.g., "Google Sheets API," "Gmail API") and click on it.
* Click the **Enable** button to activate the API for your project.
3. **Configure the OAuth Consent Screen**
* In the left menu, go to **APIs & Services** > **OAuth consent screen**.
* Select the **User type** (usually **External** unless you are a Google Workspace organization user) and click **Create**.
* Fill in the required "App information," including the **App name**, **User support email**, and **Developer contact information**.
* Click **Save and Continue** through the "Scopes" and "Summary" sections (you can define scopes later if needed).
4. **Create the OAuth Client ID and Secret**
* In the left menu, go to **APIs & Services** > **Credentials**.
* Click the **+ CREATE CREDENTIALS** button at the top and select **OAuth client ID** from the dropdown menu.
* Select the appropriate **Application type** for your use case: **Web application**.
* Provide a **Name** for your client ID (this is only for your reference within the console).
* You need to add **Authorized redirect URIs:** [**https://sl.storeify.app/oauth/callback**](https://sl.storeify.app/oauth/callback) **(****IMPORTANT****)**.
* Click **Create**.
**Retrieve the Client ID and Client Secret**
A pop-up window will display your generated **Client ID** and **Client Secret**. Copy these values and store the **Client Secret** securely, as it should be treated like a password.
You can revisit and view these credentials anytime from the Credentials page in the Google Cloud Console by clicking on the name of the client you created.
**See the detailed step-by-step screenshots from A to Z to get *****Google client ID and secret Key*****:**
**Note****: The tutorial image above is using the URI of our Quote app; you need to replace this URI with the URI of your Contact Form app:** [**https://sl.storeify.app/oauth/callback**](https://sl.storeify.app/oauth/callback)
# How to get Client ID, Tenant ID and Client Secret in Microsoft Azure
To create a client ID, tenant ID, and client secret in Microsoft Azure, you need to register an application in Microsoft Entra ID (formerly Azure Active Directory).
PrerequisitesYou must have an Azure account with permissions to register applications in the Microsoft Entra tenant.
#### **Step 1: Find your Tenant ID**
1. Sign in to the Azure portal.
2. In the search bar, type "Microsoft Entra ID" and select the service from the results.
3. On the **Overview** page, find the **Directory (tenant) ID**.
4. Copy this ID and save it in a secure location.
#### **Step 2: Create an App Registration (Client ID)**
1. In the Microsoft Entra ID menu, select **App registrations** under the "Manage" section.
2. Select **+ New registration**.
3. On the "Register an application" page:
* Enter a meaningful **Name** for the application (e.g., "MyTestApp").
* Under **Supported account types**, select an option based on your needs (e.g., "Accounts in this organizational directory only" is recommended for most applications).
* **Redirect URI:** [**https://sl.storeify.app/oauth/callback**](https://sl.storeify.app/oauth/callback) **(****IMPORTANT****)**.
4. Select **Register**.
5. After the app is created, you will be on its **Overview** page. Find and copy the **Application (client) ID**. This is your **client ID**.
6. Save the client ID in a secure location.
7. Head over to **API Permission** section in your app and add **Microsoft Graph permissions**.
8. Select **Delegated Permissions** for `IMAP.AccessAsUserAll`, `SMTP.Send` and `offline_access`, then click "Add permissions"
#### **Step 3: Generate the Client Secret**
1. From your app registration's left-hand menu, under "Manage", select **Certificates & secrets**.
2. Under the **Client secrets** section, select **+ New client secret**.
3. A dialog box will appear:
* Provide a **Description** for the secret.
* Select a duration for when the secret will **Expire**. Microsoft recommends choosing one year for easier tracking.
4. Select **Add**.
5. **Important**: The **Value** of the client secret is displayed only this one time. Be sure to copy the value immediately and save it in a secure location. You cannot retrieve it later. The **Secret ID** is not the value you need for authentication.
You have now successfully obtained your tenant ID, client ID, and client secret, which are used to authenticate your application with Microsoft Entra ID.